Kolonka User Guide
How projects, locations, tasks, and documents work in Kolonka — from your first project to public pages and integrations.
#Quick start
Kolonka keeps tasks, planning, documents, and discussion in one place. The flow is simple: create a project, choose a location, add a task, and open the view that suits the job.
Your first automatically created space starts with a dark Graphite cover and the caption “first in the space”. Change the cover in Space settings → General. Spaces you create later start without this welcome cover.
- Create a project. It holds locations, tasks, bundles, documents, and the team.
- Choose a location. Each location has its own name and statuses. Turn on sprint mode when the work needs a calendar period.
- Add a task. Choose its location and enter a title. When only one location is available, Kolonka selects it for you.
- Choose a view. List, board, and timeline show the same tasks differently — switching never creates copies.
Archive retains items for 30 days. Workspaces, projects, locations, tasks, bundles, and documents can be restored during that period unless already permanently deleted.
The introductory tour uses a project and location you can access in the current workspace. Back returns to the previous step; clicking outside the tip does not advance it. Finish with Start working, or create your first project if your permissions allow it.
#Projects page
This is the first screen after signing in: every project you can access. Open Space settings → Limits to check the current space's usage and limits.
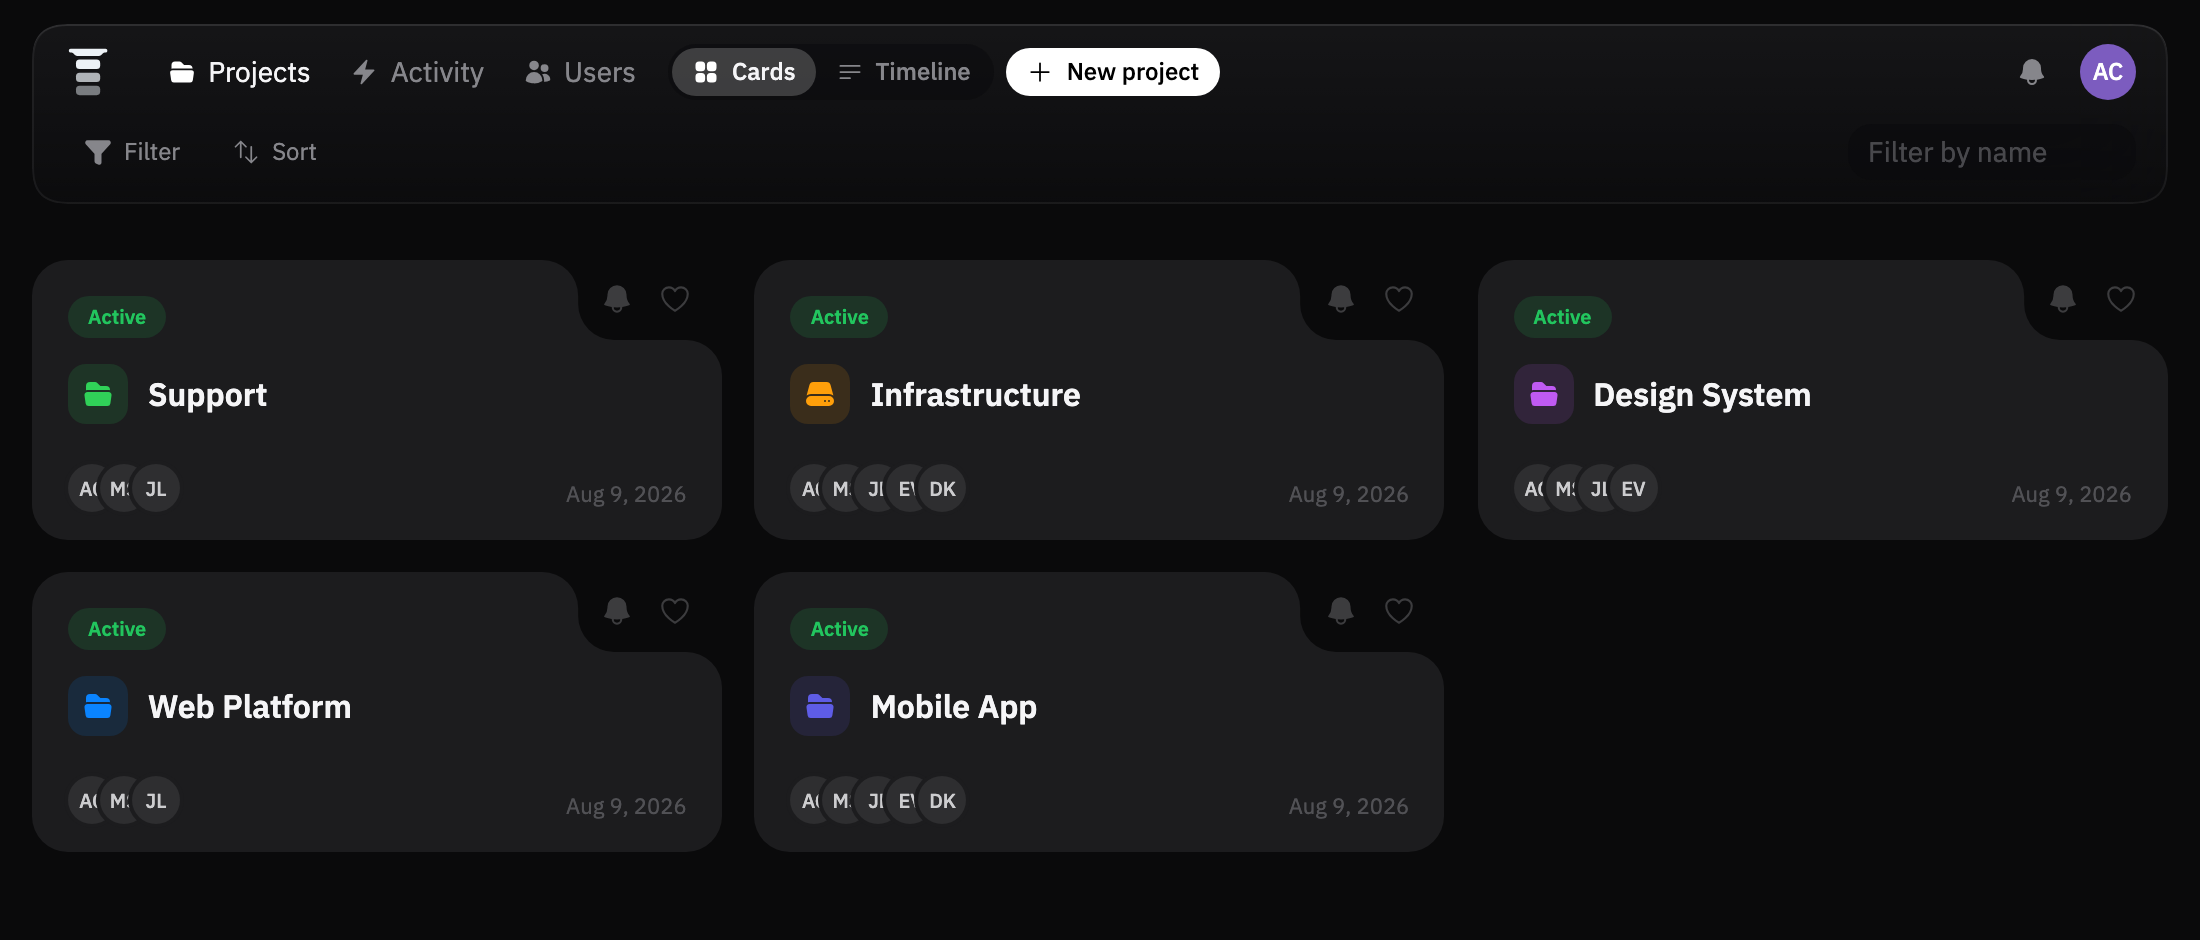
Top bar
On tablets and computers, navigation and toolbar controls share one row when they fit. Long space and project names shorten first; if more room is needed, the toolbar moves to a second row and returns when space becomes available. Your button-label preferences stay unchanged. Phones always keep two rows, and refreshing preserves the last measured layout while the page loads.
- Projects lists every project available to you.
- Activity is the change history across all projects.
- Users shows members and their access, grouped by project or by person.
- Cards / Timeline switches the page layout. The timeline puts every project's dates on one scale.
- + creates a project. Next to it sit the Display menu for filtering, sorting, and fields, and search. Save card or portfolio timeline settings at the bottom of that menu; saved card views include your chosen card details.
Project card
- Cards initially show the name and icon. Use Display → Fields to add the status, members, or creation date.
- The bell opens that project's activity; the heart pins it to Favorites.
- Click the card to open the project. The gear opens settings when you have access. These action icons stay visible even with all optional details hidden.
- Cards can be dragged; the order is remembered.
#Projects: creating and configuring
Click + on the Projects page.
- General includes the name, key, icon, and color. The key is generated for you and prefixes task numbers:
HELP-12. It cannot be changed after creation. - Access manages who can work in the project and shared access.
- Locations manages the places where tasks live and their status columns.
- Tasks configures built-in and custom fields and priorities.
Settings for an existing project open from the gear next to the project name or on its card. Changes save immediately.
- General includes the name, appearance, archiving, and cloning.
- Access contains invitations, access requests, roles, and the public link.
- Locations contains location settings, status columns, and archived locations.
- Tasks contains built-in and custom fields: number, select, multi-select, date, member, estimate, tag.
- Connectors — the GitHub connection. Choose shared access on Access to control what visitors see without signing in.
Roles
- Owner controls the whole project and can transfer ownership.
- Admin manages work, members, and public access.
- Member works with the tasks and documents available to them.
Clone copies the project with its structure. Archive removes it from the list; it can be restored from Archive for 30 days. On phones, both actions share the bottom row of project settings.
#Locations and sprint mode
A task always lives in one location. Its name, icon, color, and status columns are independent of other locations. Create location adds another; the initial Backlog can be renamed.

- Overview shows the project summary. Documents also have their own launcher.
- All locations brings tasks from every accessible location into one view.
- Open the location menu to choose a location. Its gear opens settings; its chart button opens Metrics in a separate window.
- Use a location without sprint mode for continuous work, or enable sprint mode when it needs a start and end date.
Sprints
Turn on Sprint mode in location settings and fill in both dates. Changes save automatically; the save indicator offers retry after a failure. An incomplete period or rejected save stays protected when you close or navigate away. Name edits also save on Enter.
The period becomes planned, active, and completed according to its calendar dates in the timezone saved when you configured it. The final day is included. Completion preserves a result while tasks remain in the same location and can still be edited. Extending a completed period or enabling sprint mode again preserves earlier results.
Archiving a location keeps its tasks and results in place. Restore it from Project settings → Locations → Archived. Permanent deletion requires its exact name and, if it contains tasks, a destination with explicit status mapping. Archived tasks keep their archived state. The last active location cannot be archived or deleted.
Continuous work and metrics
Without sprint mode, a location continues without a calendar boundary. Open its Metrics button from the location menu to see arrivals, completed work, work in progress, and time in the location. Sprint mode adds its period charts and saved results. Metrics are computed automatically; there is no capacity form or manual baseline setting. Time in a location starts at the task’s latest arrival there, and incomplete historical data is marked explicitly.
#Moving work and statuses
Every location owns its status set — add, rename, recolor, and reorder columns, and mark the final ones as done.
That means a status may not exist in the destination: the backlog has "Needs refinement" and the sprint does not. Kolonka then shows a mapping dialog and asks which status the task should land in.
You can move one task from its own card, or many at once — select the tasks and pick Move from the bulk actions.
#Tasks
Click Create or press C.
- Pick the project, location, and starting status at the top.
- After choosing a location, enter the title. Assignee, bundle, priority, estimate, dates, and custom fields can be filled in now or later. Your last chosen location is remembered for this project; an unavailable choice is not reused.
- Below is the description, with formatting, lists, links, images, and attachments.
- ⌘/Ctrl + Enter creates the task.
The task view
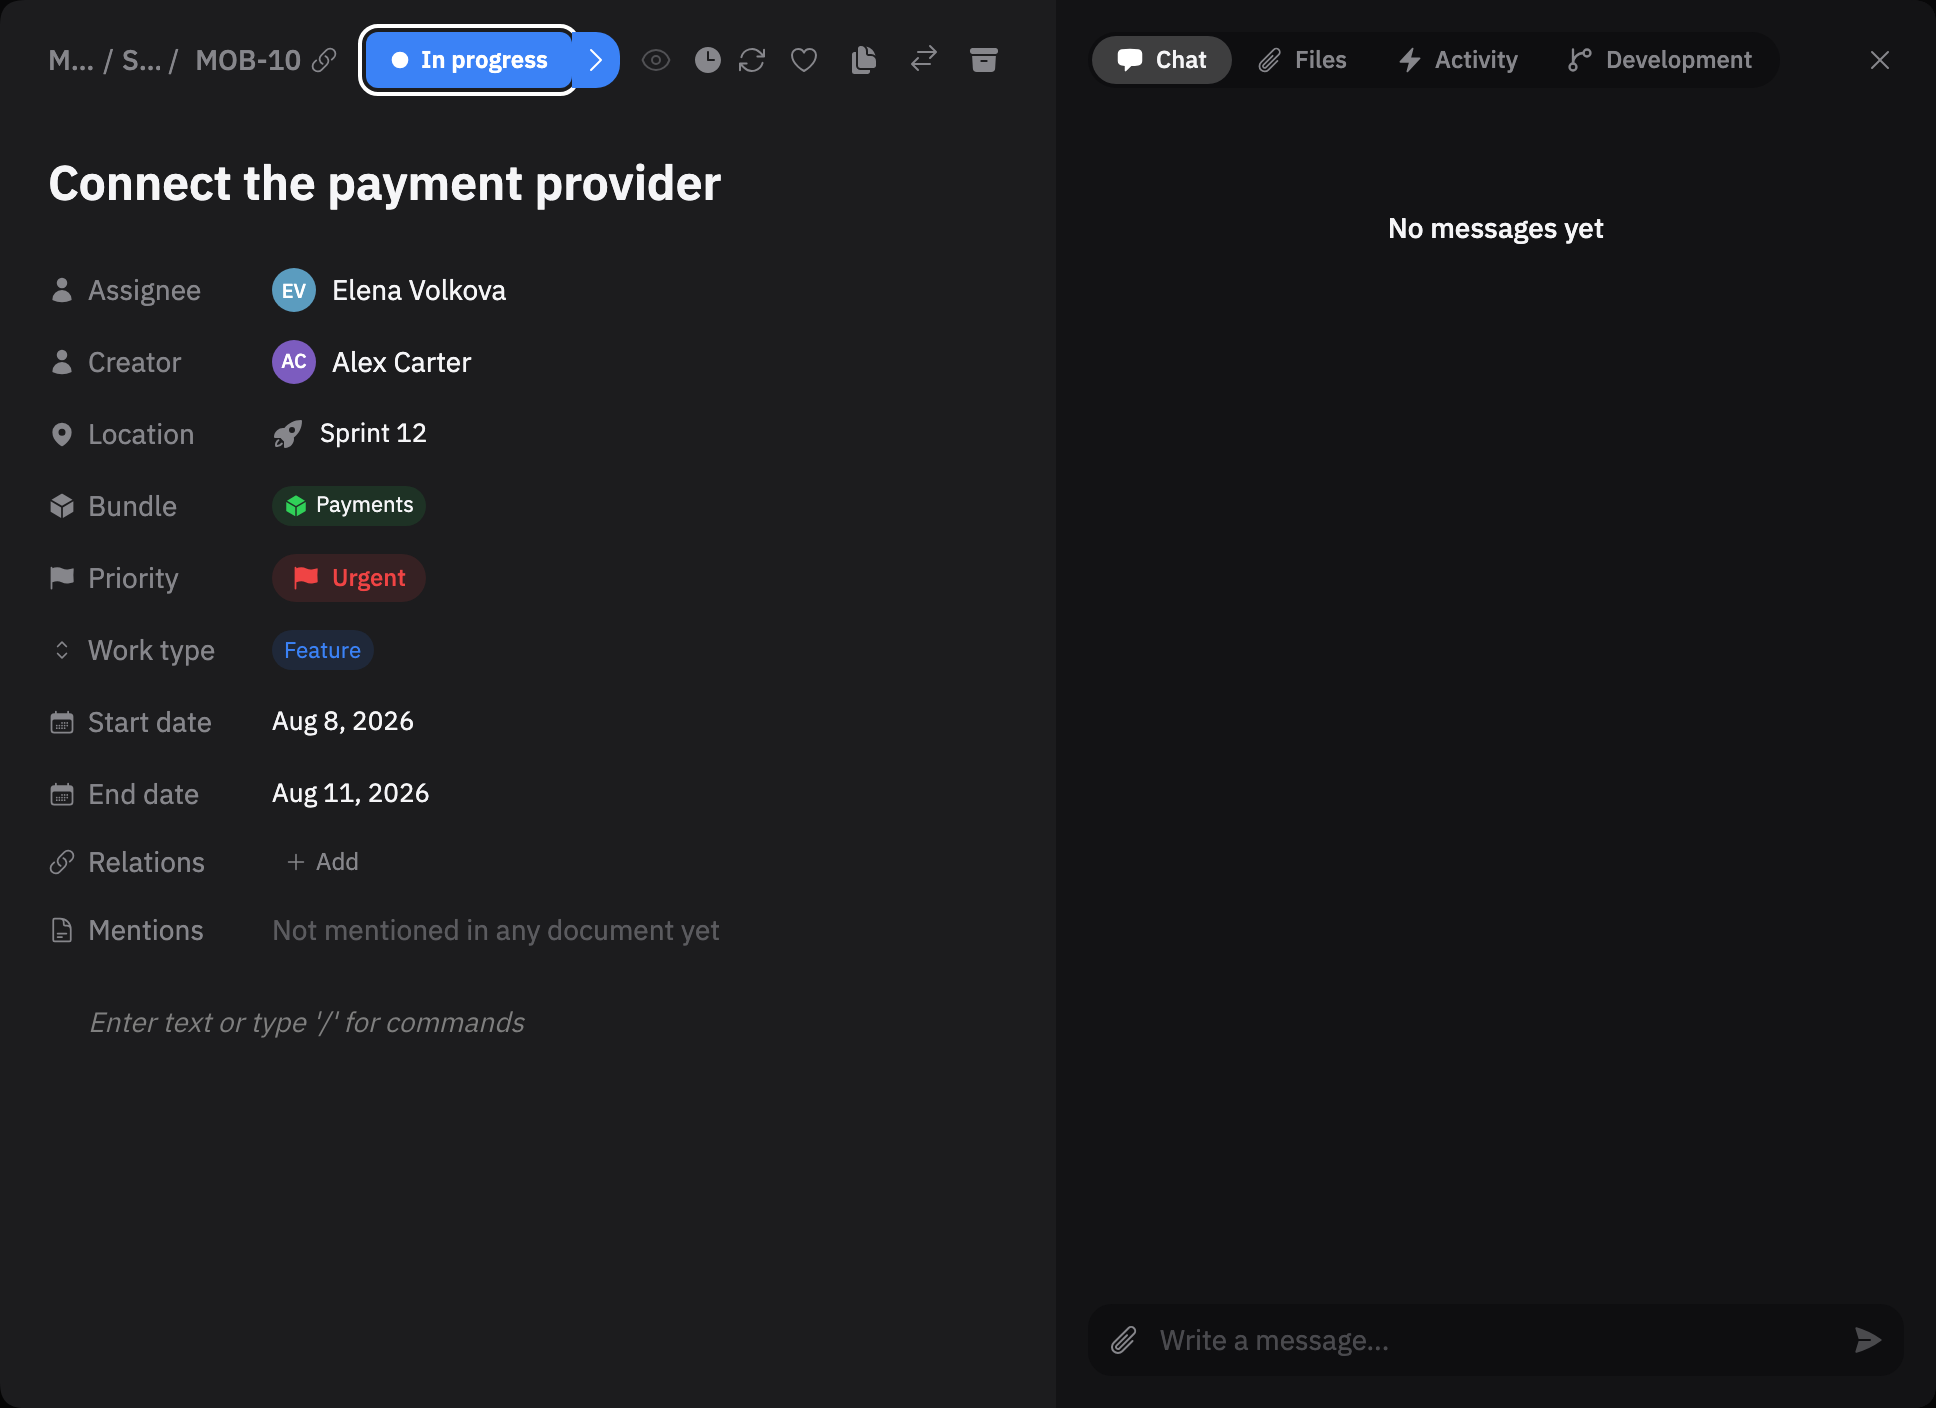
The left pane holds the title, fields, relations, and description. Its header places the status at the right edge, with the action menu immediately to its left. The right pane has the Chat, Files, Activity, and Development tabs.
- Fields. Built-in: status, assignee, creator, location, bundle, start date, end date. A project can add priority, estimate, and any custom fields. Without an existing preference, the field rows start with only assignee visible. Open Configure fields in the task menu to show or hide fields, including assignee and location, or use Hide all / Show all. The compact Fields button restores hidden rows; hiding never changes their values. Adding or filling a field does not reveal it automatically.
- Chat. Discuss the task,
@-mention teammates, reply to messages, and quote a passage from the description. Messages can be edited or deleted; the action stays in history. - Files. Attachments from the description and the chat. Images and supported formats preview in place; everything else downloads.
- Activity. The task's change history and the time it spent in each status.
- Development. Commits and pull requests from the connected GitHub repository whenever they mention the task key.
Relations
Link a task to another as blocks, blocked by, or related. Kolonka refuses to create a cyclic blocking chain. Relations show up on the task and as lines on the timeline.
The action menu beside the status lets you subscribe, copy a link, clone the task, move it to another location or project, and archive it. Click the status to choose a different one.
#Bundles
A bundle is a group of related tasks: an epic, a release, a workstream.
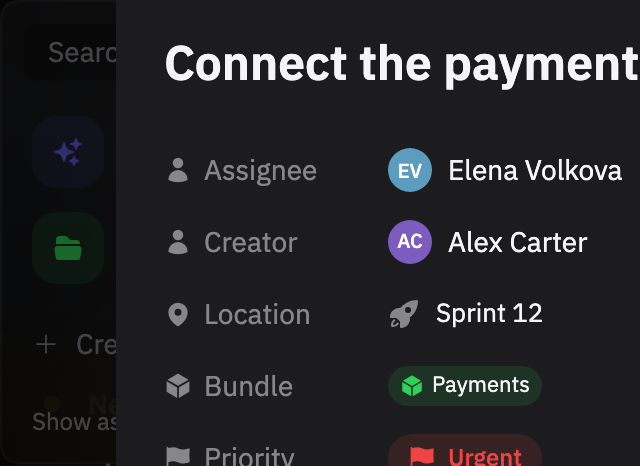
- Open the cube icon in the toolbar and click Create bundle: choose an icon and color, enter a name, and save.
- With two or more tasks selected, you can create a bundle straight from the selection. If some of them already sit in other bundles, Kolonka asks first and moves them into the new one; the move is recorded in the activity log.
- Open a bundle to rename it, add existing tasks, create new ones, and manage relations to other bundles.
- Show as subgroups turns bundles into section headers: in the list tasks nest under the bundle, on the board bundles become subgroups inside columns.
- Archiving a bundle does not delete its tasks — they simply stop being grouped.
#List, board, and timeline
Every location supports three views. Your choice is remembered per project and per location. The defaults below apply when you have no saved choice; existing display preferences are preserved.
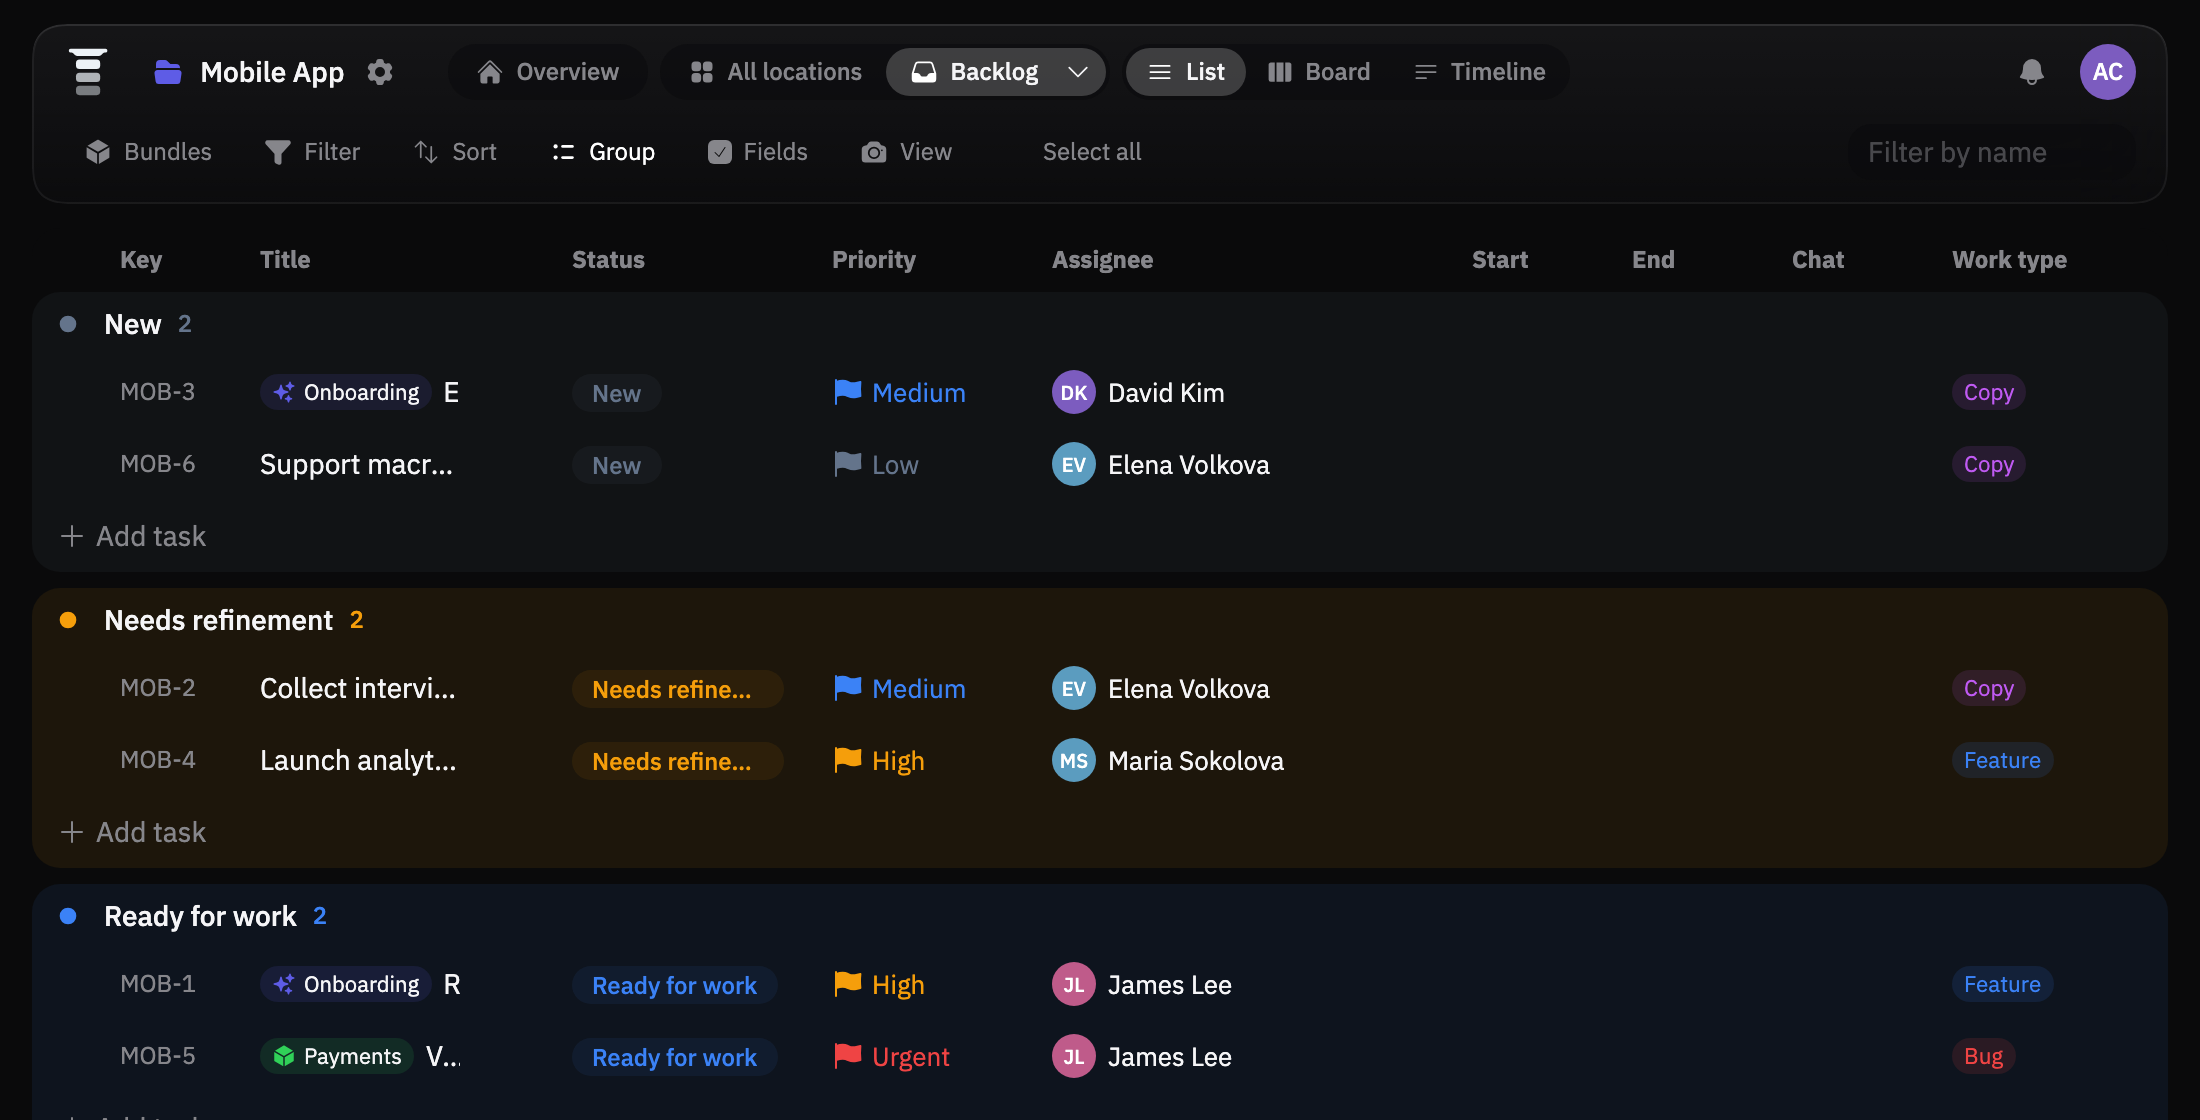
List
A table that initially shows the task key, title, status, priority, and assignee when available. Values are edited inline, and columns can be hidden and reordered. Add dates, estimates, and other fields through Display → Fields; hidden columns stay hidden after a reload.
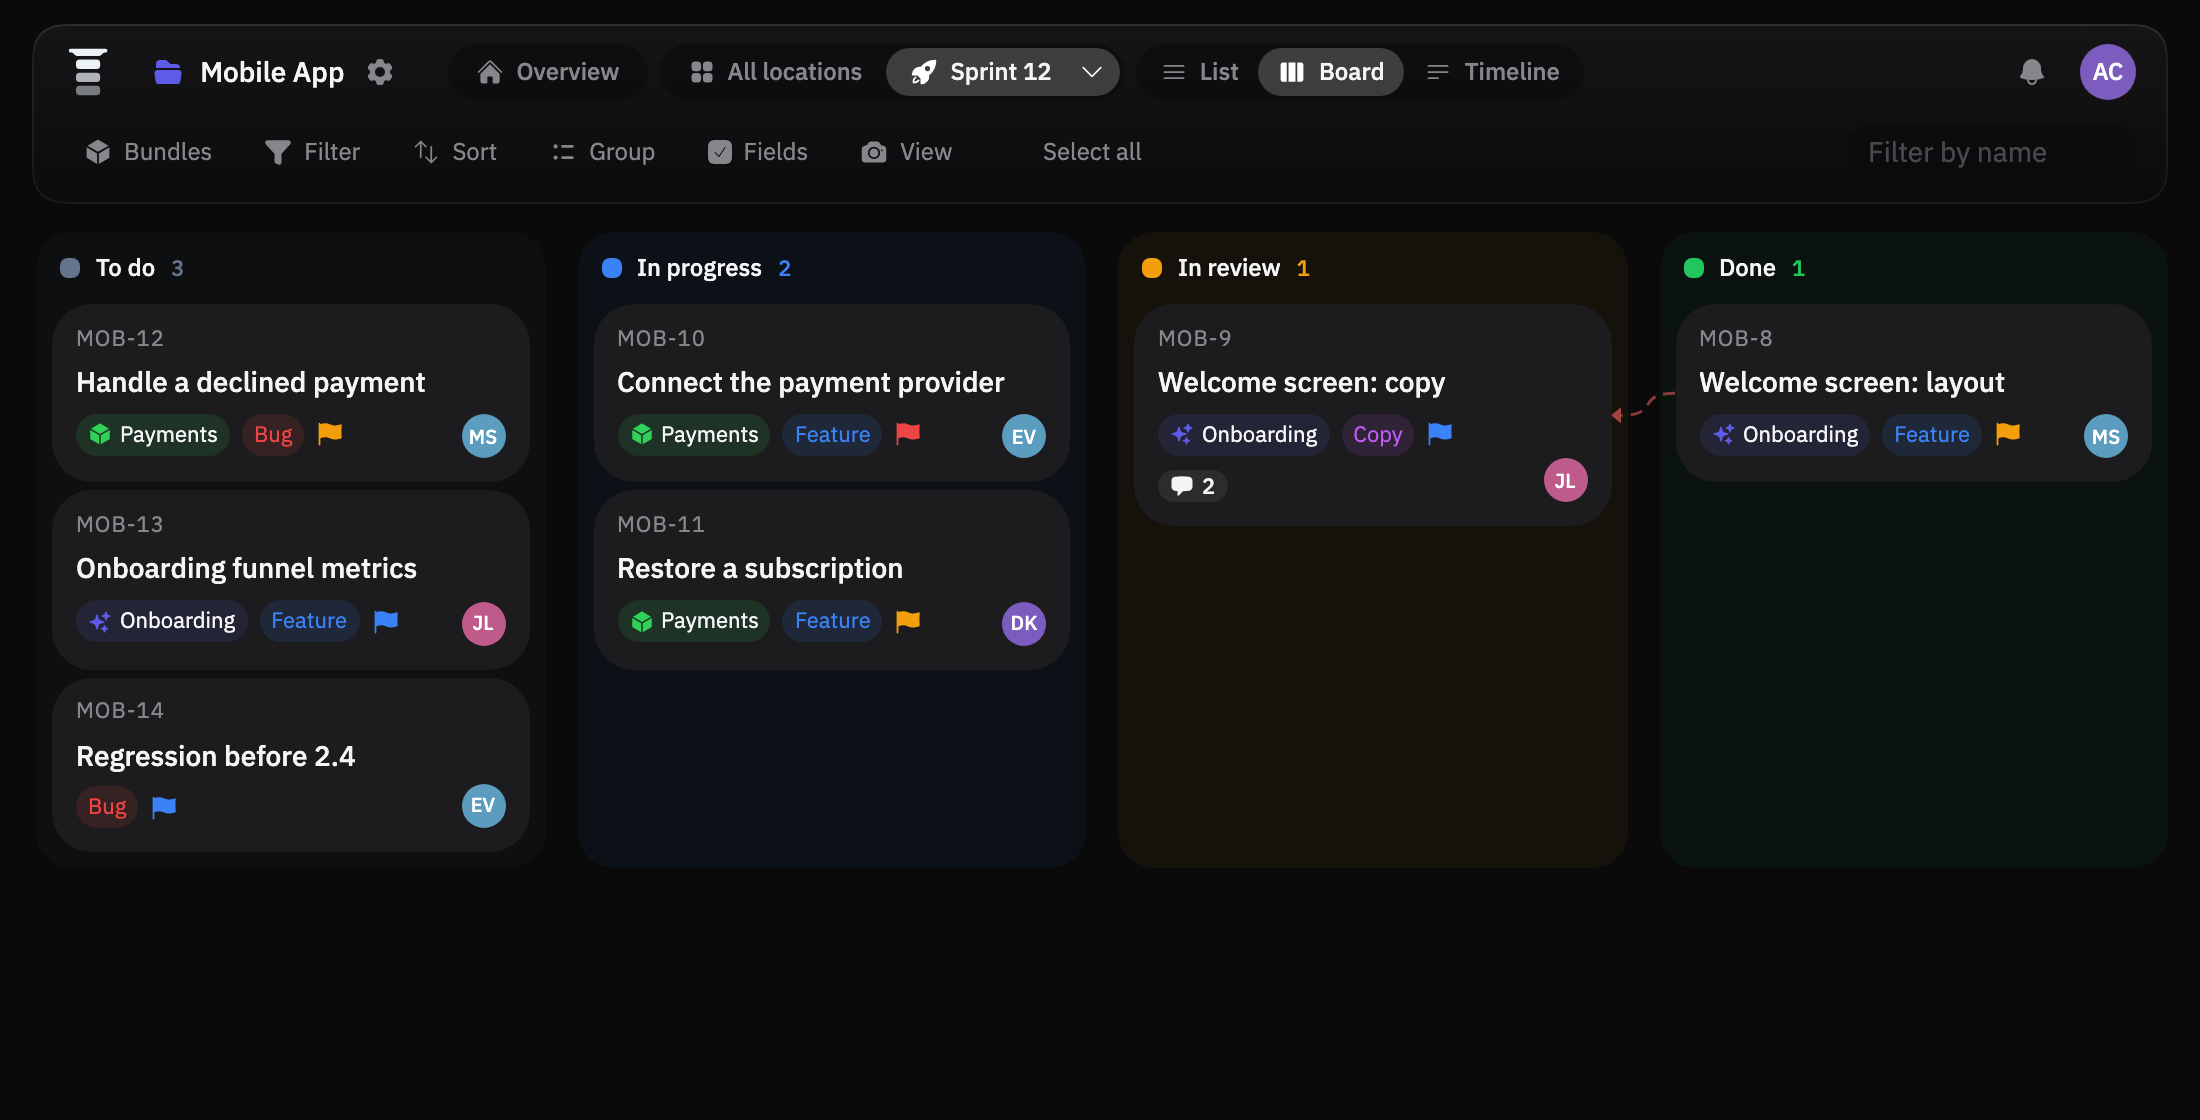
Board
Columns are statuses; dragging a card changes its status. Cards initially show only the title. Add details through Display → Fields. Column task counts and estimate totals start hidden and can be enabled in display settings.
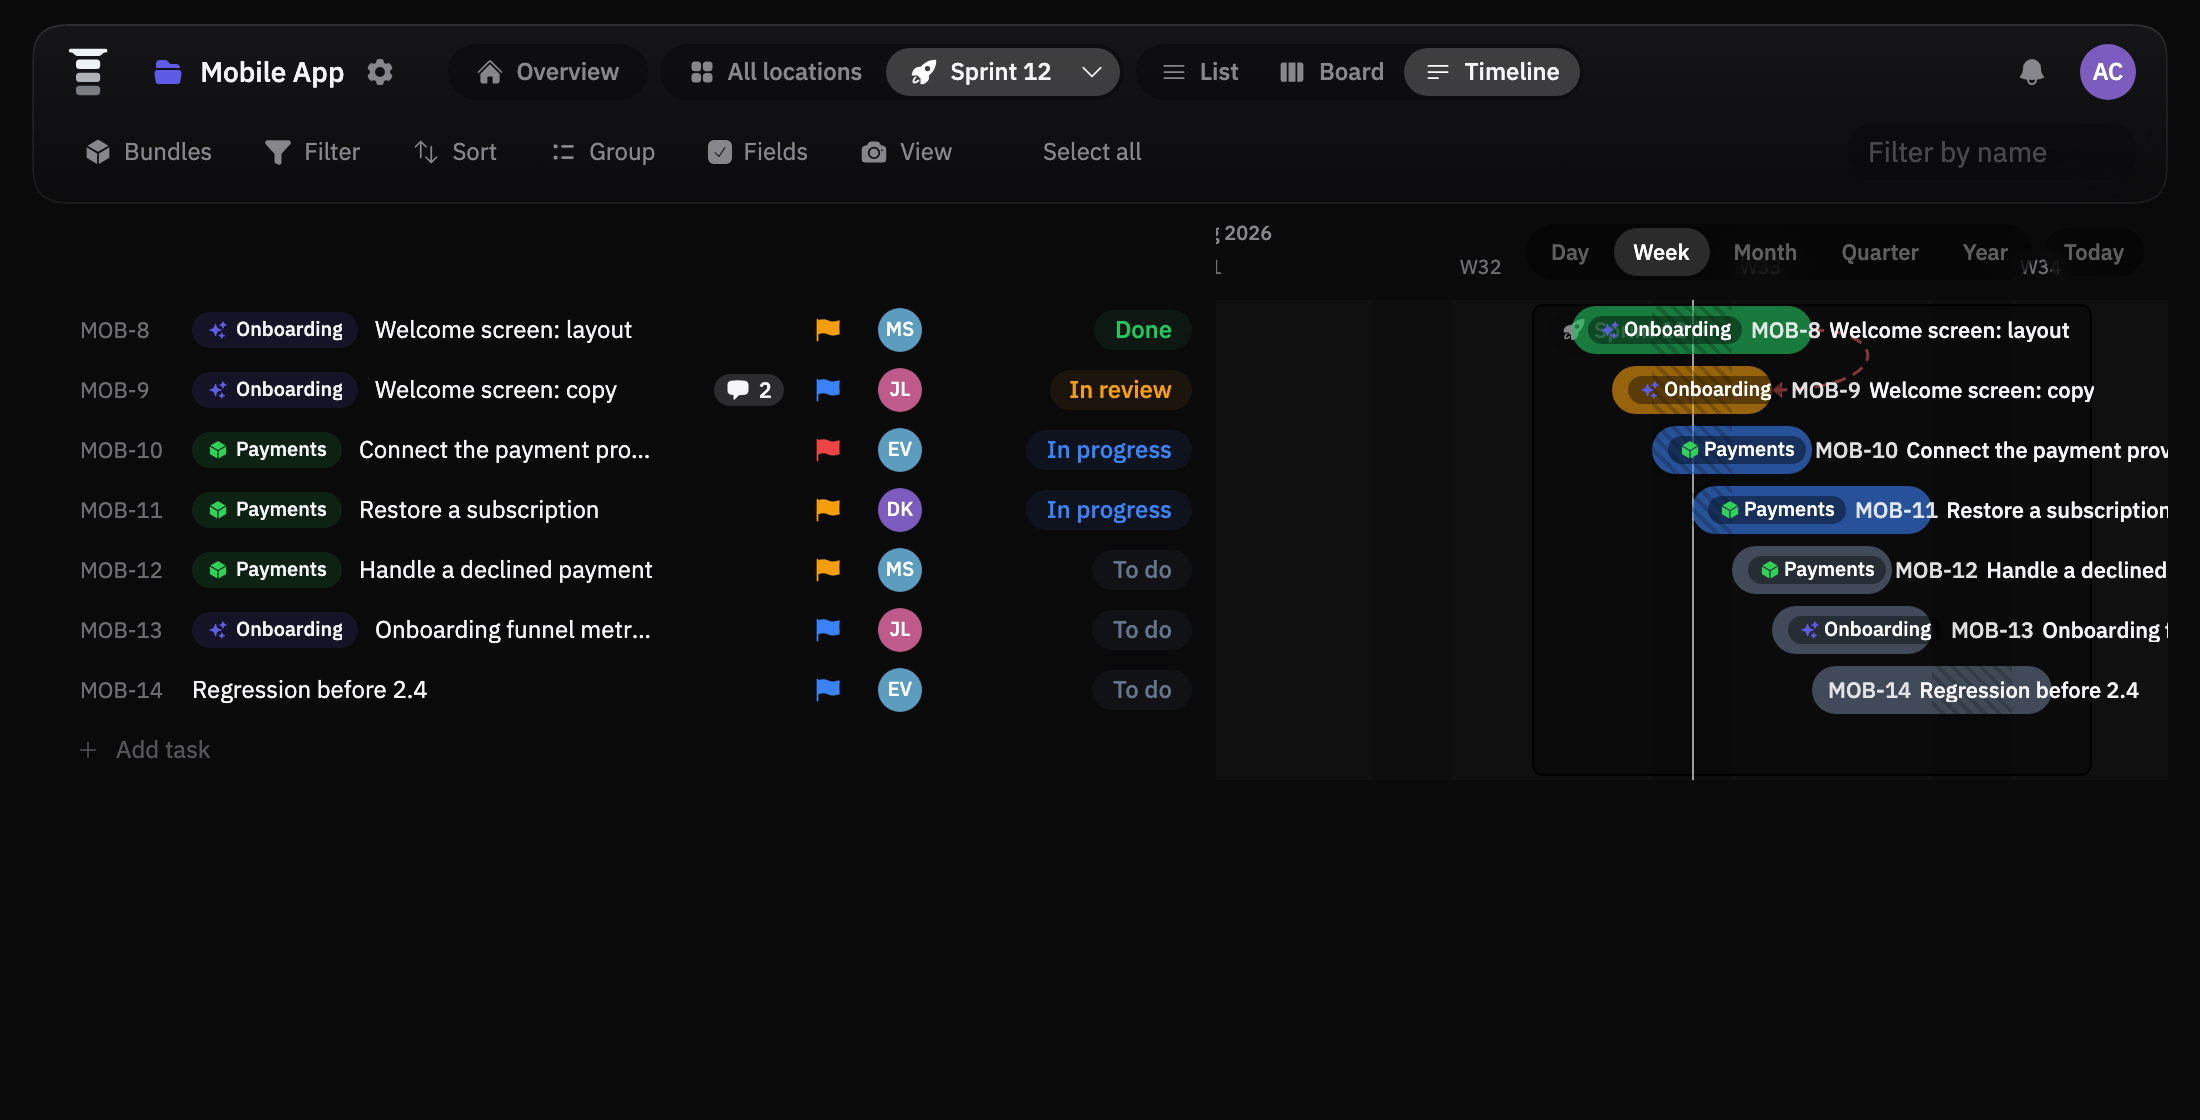
Timeline
Tasks with dates appear as bars on a scale. Drag a bar to shift the dates, pull an edge to change the duration. The sidebar and bars initially show only task titles, and relation lines start hidden. Use display settings to show more fields or relation lines and configure bar color and height.
Toolbar
Display combines filters, sorting, grouping, and fields. It remembers the last open section; compact toolbars show an icon with a tooltip. A dot on the button means a filter, sort, or grouping is not the default, and the same dot on a tab shows which one.
- Filter — statuses, members, locations, dates, relations, and custom fields.
- Sort — manual order or sorting by a field. Drag-and-drop only works in manual order.
- Group — by status, assignee, bundle, and other fields.
- Fields — separate visible-field sets for list columns, board cards, and timeline bars.
- Search filters tasks by title or task number. The global palette also accepts full task keys, including numeric project keys.
- Save display settings at the bottom creates a named view. Saved views appear as rows above that button; long lists scroll. Click a row to apply it, or its three-dot menu for actions, including visibility changes your permissions allow. The checkmark disappears when the current settings differ from the saved view.
Bulk actions
Select several tasks with the mouse or Shift and the bulk menu appears: change status, assignee, priority, and other fields, collect the tasks into a bundle, move them to another location or project, or archive them.
#Documents
Documents are the project's built-in knowledge base: requirements, decisions, runbooks, and plans live next to the work.
- Structure. A document can be a container with child pages and sub-pages. Pages are created from the left panel and reordered by dragging.
- Editing. Type, or press / for the block list: headings, lists, links, images, files. Changes save automatically and an indicator shows the save state.
- Access. Project members get a baseline level: edit, comment, view, or no access. Individual people can be granted an exception.
- Comments. Support replies, editing, and soft deletion.
- Version history. Kolonka saves versions as you work. You can name an important state, open it read-only, and restore it.
If the document has already changed in another tab, the stale version will not overwrite the newer content.
#Notifications
Kolonka separates what needs your attention from the full project history.
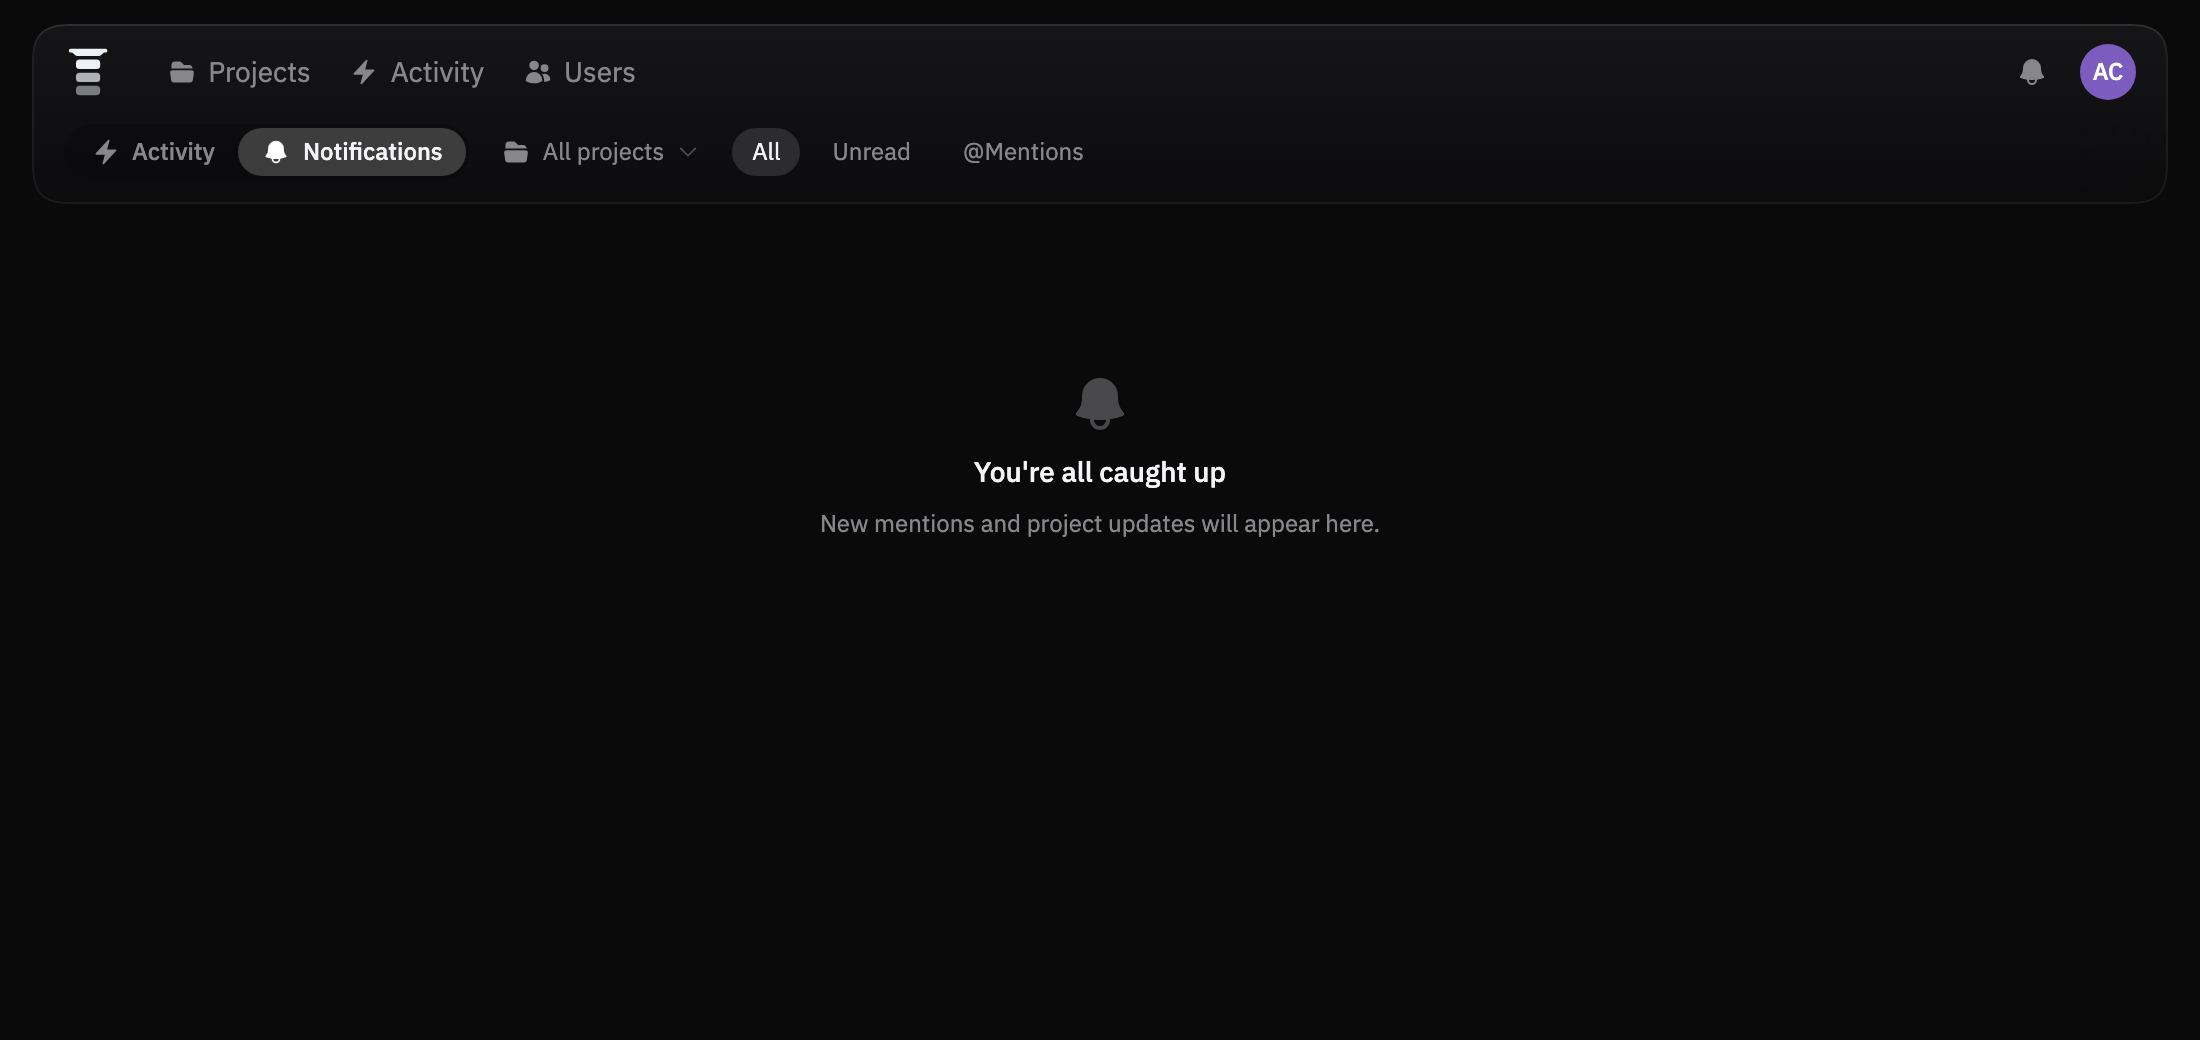
The bell shows unread items. The notification center has All, Unread, and @Mentions tabs, a project filter, and read/unread actions.
Notifications cover mentions, assignments, messages in tasks you follow, status and field changes, approaching due dates, sprint start and completion, access requests, and new tasks submitted through the public form.
Following a task
Click the heart on a task to receive its updates. Kolonka subscribes the assignee and everyone in the discussion automatically. Everything you starred is collected on the Favorites page.
Channels and Telegram
For each project, pick the events you care about and the delivery channel: in-app, Telegram direct messages, or both. A project can be muted entirely.
Telegram is linked from your profile on the Security tab. The bot is used both for notifications and for password recovery.
#Shared access
A project can be shown to people who have no access to your workspace.
On the Access tab, expand Shared access, turn on the link and choose the available locations and documents to publish. Public visitors do not get internal activity or location metrics. If only documents are published, the link opens them directly; if nothing is published yet, it shows an explanation.
- Documents. Only pages published on their own appear in the public documents section. Open a document, click Access, and publish the current page or the whole document. New pages stay private until you publish them.
- Task intake. For chosen columns you can let signed-in visitors submit new tasks. The author sees their own submission and can edit or withdraw it until the team starts work.
Visitors only ever see published data: emails and internal comments are never exposed, and task attachments stay available to signed-in users only.
#GitHub
In project settings, open Connectors, connect the GitHub App, and pick repositories. Commits and pull requests that mention a task key (HELP-12) show up on that task's Development tab. Optionally, a task moves to a status of your choice once its pull request is merged.
#Profile and preferences
Click your avatar in the top-right corner and open the profile card.
- Profile — name, avatar, email, and open tasks.
- Security — password, recovery, Telegram, data export, and account deletion.
- Notifications — events and channels per project.
- Preferences — theme, font, language, accent color, interface density, compact locations, view modes and toolbar, click behavior, and the default project view.
- Storage — usage against your limits: projects, tasks, documents, files, and space.
#Search, shortcuts, and archive
- ⌘/Ctrl + K opens the palette: search across tasks and projects plus quick commands.
- C creates a task; ? lists every shortcut available on the current screen.
- Arrow keys move focus between cards and rows; Enter opens whatever is focused.
Other sections
- Activity shows the change history across every project you can see. Open Display → Filter to choose projects, people, and action types, or Display → Sort to choose newest or oldest first. The space's Activity section uses the same menu. On phones, open Display from the space's actions menu; Back returns to that menu.
- Favorites — the projects and tasks you starred.
- Archive — workspaces, projects, locations, tasks, bundles, and documents retained for 30 days. Rows show name, archive date, type, and who archived the item; unknown historical values are labeled. Use Display to filter by type or sort by date or name. When permitted, restore an item or delete it permanently right away. Deleting a workspace or project requires its exact name; a button beside the name copies it.
- Error log — technical records for diagnostics; normally only needed when contacting support.